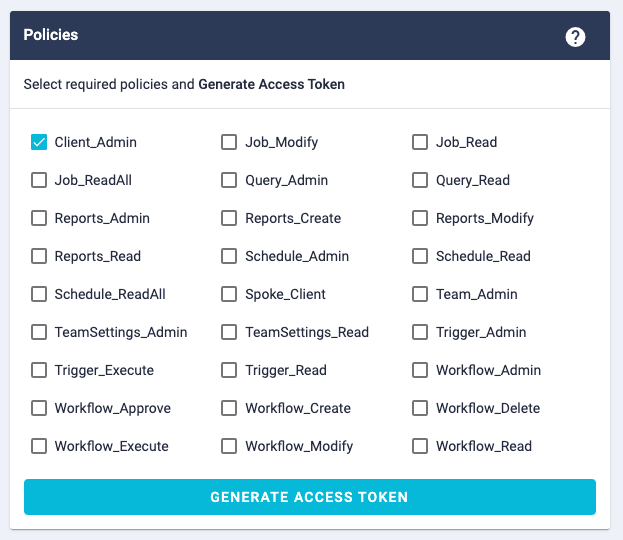
Create an M2M Client
1. Get a Token
In order to create a machine to machine client you will need a token, that token needs to have been created by an OWNER user*1 and it needs to include one of the scopes that meet the Client_Admin policy.

*1 Ask your team administrators for the identity of your team owner(s), they are generally the people responsible for the account
2. Decide upon the Scopes and Permissions for your Client
In order to understand the scopes and permissions required by your client you’ll first need to describe the range of actions that you want it to be able to take, for example
I want my application to be able to create scheduled jobs in WorkfloPlus in order to do that it needs to not only be able to create the scheduled jobs but also access the list of workflows and users in order to assign that job to the right person and assign the relevant workflow
From this type of description you can then list out the APIs that you’ll need to make requests to, in this case
And by reviewing the policies for each of those APIs, in order to satisfy all policies I can see that I need the following permissions:
- ADMIN
And the following scopes:
- https://www.workfloplus.com/auth/workflow.read
- https://www.workfloplus.com/auth/schedule.admin
3. Request a new Client
I can now combine the details together into a request to create the new client
curl --location --request POST 'https://accounts.workfloplus.com/api/client/' \
--header 'Authorization: Bearer tokenGoesHere' \
--header 'Content-Type: application/json' \
--data-raw '{
    "name": "My Job Scheduling Application",
    "scopes": ["https://www.workfloplus.com/auth/workflow.read", "https://www.workfloplus.com/auth/schedule.admin"],
    "permissions": ["admin"]
}'
And the response should be of the form
{
    "client": {
        "clientId": "6169571beee5ee0101a4b58c",
        "grantTypes": [
            "client_credentials"
        ],
        "secrets": [
            {
                "secretId": "4897852beee5ee0001a4b58b"
            }
        ],
        "teamName": "myteam",
        "displayName": "My Job Scheduling Application",
        "scopes": [
            "https://www.workfloplus.com/auth/workflow.read",
            "https://www.workfloplus.com/auth/schedule.admin"
        ],
        "allowAccessTokensViaBrowser": false,
        "clientPermissions": [
            "admin"
        ]
    },
    "newSecret": "8JnEe4471tvwc0GvsS0CUxpv1TW35CJJ"
}
As soon as you get this response, securely record both the clientId and the newSecret, this is your only chance to capture the newSecret for this client
4. Use the Client to request Tokens
Having created the client you can now use the credentials you have stored above to request tokens as and when your application needs them, in order to request a token execute a request of the following format
curl --location --request POST 'https://accounts.workfloplus.com/connect/token' \
--header 'Content-Type: application/x-www-form-urlencoded' \
--data-urlencode 'grant_type=client_credentials' \
--data-urlencode 'client_id=6169571beee5ee0101a4b58c' \
--data-urlencode 'client_secret=8JnEe4471tvwc0GvsS0CUxpv1TW35CJJ'
The response model should be of the following format
{
    "access_token": "eyJhbGciOiJSUzI1NiIsImtpZCI6ImYxYTNhMWU0M2IxZWVlYzgwMGE1MTZjMWQ0ZTViZGUyIiwidHlwIjoiSldUIn0.eyJuYmYiOjE2MzQyOTQ5NzYsImV4cCI6MTYzNDI5ODU3NiwiaXNzIjoiaHR0cHM6Ly9hY2NvdW50cy53b3JrZmxvcGx1cy5jb20iLCJhdWQiOlsiaHR0cHM6Ly9hY2NvdW50cy53b3JrZmxvcGx1cy5jb20vcmVzb3VyY2VzIiwiNWI1NWQ0NzYxOWEyNzY2MjI3NmQ0ZTk5IiwiNWIyZDI3NzRiZjA5MTRjYzdjOTU5YmVjIl0sImNsaWVudF9pZCI6IjYxNjk1NzJiZWVlNWVlMDAwMWE0YjU4YyIsImludG93YXJlLndvcmtmbG9wbHVzLnRlYW0iOiJpd2ZpZWxkc2VydmljZXMiLCJzY29wZSI6WyJodHRwczovL3d3dy53b3JrZmxvcGx1cy5jb20vYXV0aC9zY2hlZHVsZS5hZG1pbiIsImh0dHBzOi8vd3d3LndvcmtmbG9wbHVzLmNvbS9hdXRoL3dvcmtmbG93LnJlYWQiXX0.UFL9BwYNTMV8Fo9EJOKoqXxfw_UZ1emJ1-wDbLnSGM5itTp-7QUwKhA1Q82RSYbVCDzmhshHpCKWJfW8W-tRKcqgTFEwggSOPr_yrrH5eSfGvxDiL_0cDcrouXvx2prIL0BtTGXOIY7LwFjYFoZvq31wrVSPZc7evttOqgoHER25VxuY87oA8Dvk-iCEjuGbxPMmqZ__RUMjwihU-aEosUUdyjY6CDqktrmvrMWQsiAqU82UuPu_D4WWqGo8qSHjeigepW0KN4ZHScA66_OPnp2OsNio4LjoqpMWdP1U4a2y2adQTT9PkYJ29SVyONqfBXlTt6QEIEr83uauaxMf9Q",
    "expires_in": 3600,
    "token_type": "Bearer"
}